To create a low cost syringe pump using a stepper motor and a microcontroller (arduino in our case). This will be used to gradually administer small amounts of fluid.
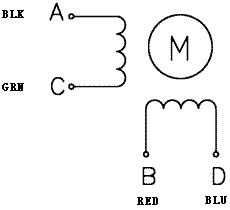
This NEMA 23-size hybrid bipolar stepping motor has a 1.8° step angle (200 steps/revolution). Overall it takes 12V DC supply and 2A current. Motor can hold torque of 13 kg-cm (180 oz-in). The motor has four color-coded wires terminated with bare leads: black and green connect to one coil; red and blue connect to the other. It can be controlled by a pair of suitable H-bridges.

The required flow rate has to be controlled by changing the delay present in the arduino code. The exact mapping between flow rate and delay (which corresponds to number of steps per second ) hasn’t been determined yet. The plunger holder has to be driven back enough so that the syringe is in it’s maximum length state. This has to be done by driving the motor in a clockwise direction. After fitting the syringe, upload the code to arduino and turn on the power supply.
There was an issue in printing the hub nut through which the lead screw would pass (which converts the rotational motion of the lead screw into translation of the plunger). The pitch of the screw could not be exactly matched with the standard lead screw pitch. So, we couldn’t use it further. Though, this problem has been resolved.
Another issue which is still a problem is that the plunger holder which drives it, has wobbling when lead screw rotates fast. This could have been reduced to a great extent by inserting two rods end-to-end (passing through the plunger holder) which would stop it from wobbling. We bought two 4mm SS rods. But this could not be placed due to mechanical constraint in the model.
Replacing the existing lead screw with a more precise one to reduce wobbling effects.
Making a shield for arduino board and power supply so that the wiring is not messy.
Making serial communication from a terminal possible so that commands can be sent by the user. We are planning to do this using CoolTerm more can be found here .
Building a step down transformer and rectifier circuit to supply power to arduino from the main power supply itself.